


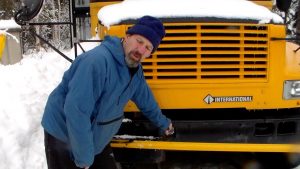
I felt a bit trepidatious about the skoolie stop sign and “buttwhacker” removal. When I took out the driver’s air seat, I couldn’t find the right part to cap the airline. (It’s an air seat). So when I disconnected it to remove the plywood under it, air came whooshing out with wild abandon.
So I hooked it back up.
School Bus Law
Since this is a skoolie conversion, however, The other school bus apparatus needed to come off. Although laws vary state to state, many require the removal of school bus equipment like flashers, stop signs, and what I love to call “the butt-whacker.” (The arm that extends in front of the bus to ensure that students walk far enough in front of the bus so that the driver can see them.)
For example, Illinois law states that:
“No vehicle other than a school bus shall be identified with the sign “SCHOOL BUS”, shall be equipped with a stop signal arm, shall be equipped with a strobe lamp or shall be equipped with a warning lamp system as described in Section 12-805 of this Act. No commuter van or bus other than a school bus shall be painted national school bus glossy yellow or a color that closely resembles national school bus glossy yellow.”
Although many people like to preserve the cool skoolie look of these devices, we removed ours for several reasons.
First, we want to align with safety protocols. I mean, manufacturers make school busses look different for a reason: to make people pay attention. “
Yo, Driver!! This is a SCHOOL BUS. With SCHOOL CHILDREN on or near it! They already suffer from undeveloped prefrontal cortexes and struggle with sound decision making. Use CAUTION around them!”
Indeed, after 27 years of teaching in public schools, I don’t want to dilute the awareness pool!
Maintenance
Second, I find that as I get older, I make many decisions based on this condition: “Is this [blank] going to increase or decrease future maintenance requirements for me?” If the answer is “INCREASE” I rethink that decision.
Lights leak. Eventually. So do wiring access holes leading to the aforementioned stop signs and buttwhackers. They might lend a cool vibe but for us: not worth it.
And third, even though I hear it reputed that law enforcement officials, for the most part, don’t harass Skoolie owners. We don’t really want to press our luck. I mean, paddlers are good folk”¦but, admittedly, a bit lawless at times. Why stack the odds against us?
So…onward with the process.
Removing the Crossing Arm
The dismantling process can be terrifying. What if I cut the wrong thing and my bus explodes? Well, maybe not that extreme, but, cases certainly occur where people can’t get their bus started or, now, when they turn on the radio the horn beeps. We hoped to avoid those scenarios.
First, I removed the bolts from the cross arm assembly. Some were easy, some required a grinder to cut them off. Then I used an open faced wrench to remove the airline.
Fortunately no air came whooshing out, so I concluded that the air supply (the mechanism, not the band) only whooshed through when switched on.
Whew.
Adding NPT Caps
I cut zip ties and traced the airline back to one side of a single solenoid in the electrical panel. I removed the air-line from one side. I traced the other side airline back to a valve in the engine compartment and disconnected it.

There was a lot of whooshing.
So I reconnected the line and went to buy some 1/4″ npt caps.
The next day I drained the air from the tanks, disconnected the airline form the engine compartment valve, slopped some pipe compound on the threads, and put on the cap.
No more whooshing.
Stop Sign Removal
On to the stop signs!
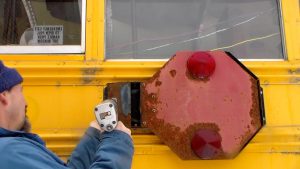
I removed the bolts holding them onto the sides of the bus and pried them free from the caulking sealing access holes. I patiently disconnected the wires from the front one and unbolted the npt connector. (The bolts for the wires were rusted in the back, so I just cut them.)
The wiring and airline in the front were easy; I pulled them directly into the electrical panel area and disconnected them from the solenoid and from the wire terminals.
For the back ones, I had to crawl under the bus and pull the lines from the frame all the way to the front of the bus. Then into the engine compartment, though the firewall, and back into the electrical panel.
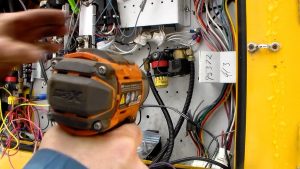
I disconnected one end from the solenoid, then traced the airline on the other solenoid back to a junction under the dash by the driver’s seat. Here, I was able to disconnect the air source from a T that connected the air seat and the air doors. I disconnect the feed to the stop sign solenoid, applied some pipe dope, then capped the end.
Great happiness, the stop signs and crossing arm were removed!
If you like this blog post, you’ll love our free PDF that shows you how you can save HOURS or even DAYS over the course of your build. Click here for immediate access!
Check us out on youtubet