
Skoolie conversions are all about customization.
I mean, if you wanted a “stock” product or a cookie-cutter lifestyle you’d buy an RV. Or live a a “development.”
But skoolie owners want something unique and personal.
So, to add some personal style to our build, I began by modifying the console.
Design Features
I had already removed the rocker switches, fan controls, windshield washer knobs, and mounting plates…and the console itself from the bus.
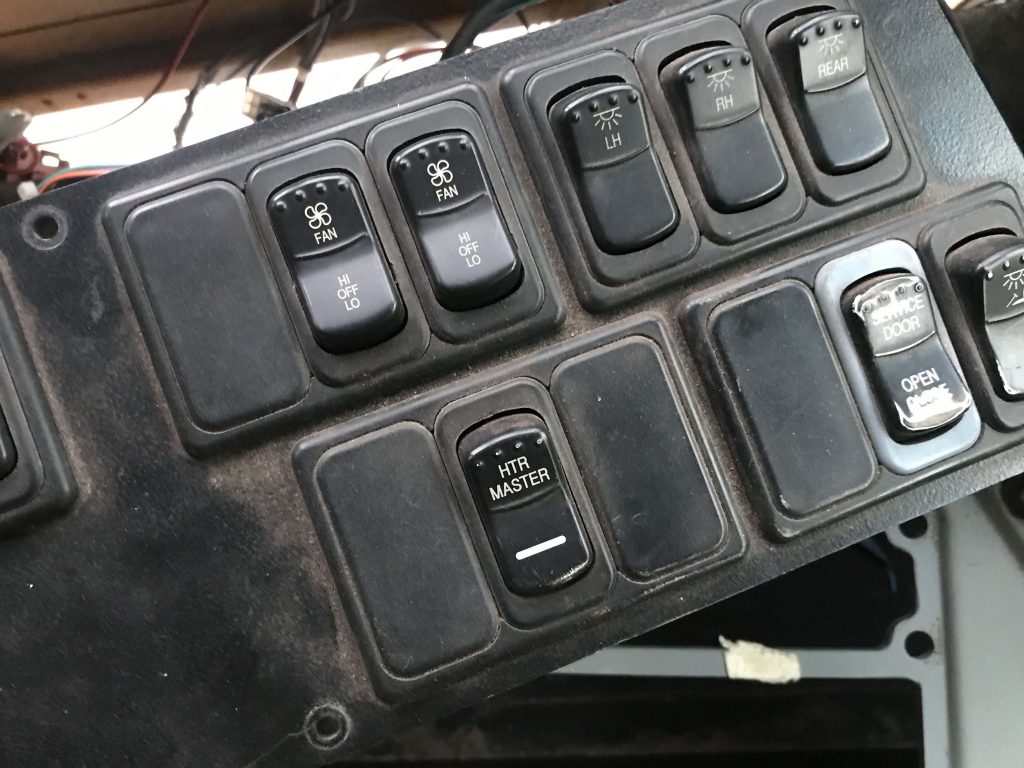
The challenge now was to reorganize them. The switches click into plastic housings. Most of the housings held groups of three switches. One held four, and the master flasher bay held…well, I forget. But I broke that one anyway getting it out so it doesn’t matter.
I removed several of the circuits. For example, we will control lights from wall mounted switches in the cabin of the bus, so I don’t need them on the console. We don’t need the stop flashers or the cabin heaters.
Not all the deleted circuits were grouped together, so as it were, I several bays with one or two switches. So I regrouped them all.
I also added a switch to eventually power up the back-up camera and also a USB charging port
I also wanted to consolidate all the switches into the upper openings of the console to free up the lower opening for cupholders. It was a bit of tight fit, but I managed to cram them all in there.
Building Process
Layout and Cutting
I took the plastic ABS mounting panels and traced them on some 1/4″ birch plywood I had kicking around the shop. I’m such a pack-rat with this stuff! It clutters things up, but I always think “Hey, I could use this someday!”

It finally paid off. I love using free materials!
After tracing the panel outlines, I used a box-cutter knife to cut the traced lines. I find that even with sharp blades, cutting plywood tends to create tear-out and splinters on the thin veneer. Slicing the fibers helps prevent that and I find it works better than using blue tape.

I cut out the straight edged shapes with my chop saw and table saw and used my baby band saw for the rounded panel.
Once I had cut out the rough shapes, I drew in the lines marking the openings for the switch bays and the radio. I drilled holes in the corners of each opening so that I could get my jig saw into the opening and cut them out.
I also drilled out the holes for the screws that hold the panels into the console.
Pro Tip: After completing a cut, make sure that the blade fully stops moving before lifting the saw out of the opening. If you don’t, the moving blade catches the material and breaks it. (Don’t ask me how I know this…)
The Cupholder
After finishing the mounting panels, I tackled the epic cupholder problem.
We didn’t have one.
It really needed to live on the lower opening so that it was level.
There was a plastic divider that went across the opening to support the two mounting plates that had previously resided there. So I cut it out with some snips.
Then I contemplated how I would mount the cupholder there.
I puzzled and puzzled til my puzzler was sore.
Some heavy duty ‘sposin’.
I finally decided to build a box with 3/4″ top and bottom (cedar kicking around the shop…score #2 for the packrat!) and 1/4″ sides.

I used a 3 3/4 hole saw to drill two holes in the top piece. I then used a round-over bit on my router table to soften the edges.
I also used my router table to cut blind dados in the bottom of the top and the top of the bottom piece to fit the 1/4 plywood into. (That was a fun sentence to write. I hope it makes sense!)
I glued the hole kit and kaboodle together.
Then I had a horrible thought.
If I was going to use the top piece to hang the cupholder into the console, how was I going to fit it in with the bottom piece just as wide?
I had designed myself into a corner.
Rats.
I did some more ‘sposin’ and decided that the glue would hold the bottom onto the inside sides without needing the outsides of the groove. (This theory is still being tested. We’ll see how it holds up).
So I used the table saw to trim off the outside lips of the bottom piece.

Then it fit!
Sanding and Finish
After I checked to make sure all the switch bays fit, I gently sanded each panel with 220 grit sandpaper. The veneer on these plywoods is whisper thin so be careful that you don’t sand through it.
Then I wiped then down and brushed on a coat of shellac.
*Shellac endorsement: I love shellac! It has the luster of an oil-based finish that really makes wood grains pop. But it dries MUCH faster than oil based finishes, cleans up better, and is a natural product. (Comes from bugs, did you know that?)
I find water-based polyurethanes leave a milky “plasticy” looking finish.
The down side to shellac is that it doesn’t handle water very well. So, I went with the best of both worlds. I put a coat of shellac on to pop the grain, then covered it with two coats of poly.
Installation
Once the finish had dried, I reinstalled bays with switches, then fan control module and the windshield washer controllers.
Then out to the bus for installation!
I screwed the console back in, then set about to reconnect all the wires.
I had to create wire leads for the USB charging port and the backup camera.
I found that on our bus, the smaller gauge blue and white wires are the power and ground to the little lights in the switches that come on with the headlights.
The thicker black wire goes to the main power bus-bar, and the gray wire provides switched power to the accessory.
I used a pair of crimpers to put crimp connectors on the ends of the wires. I highly recommend a crimp tool because in my process of repairing mouse-chewed wires before, I had used a simple pair of pliers as crimpers. They fell off almost immediately. Sad day.

After hooking everything up came the moment of truth.
Will everything work?
Will I set the bus on fire?
Do people really believe that the Love is Blind show is real?
Suspense hung in the wind.
I fired up the bus and immediately noted that I had installed the USB port upside down. I’m not normally OCD, but I couldn’t leave a 14.4 volt reading upside down. It just wouldn’t do.
However, everything worked! The windshield wipers went SWOOSH SWOOSH SWOOSH! The fans blew dust all over the place. The door opened…after I had flipped the engage lever.
Victory was ours!
(Except for a puff of smoke associated with the bus / driver air control knob. I had some more mouse snacking there that I hadn’t seen. I think it’s fixed now).
Conclusion
So know we have a custom designed and built console for the bus!
With cupholders.
I’m actually looking forward building the dashboard.
Stay tuned!
If you like this blog post, you’ll love our free PDF that shows you how you can save HOURS or even DAYS over the course of your build. Click here for immediate access!
Check it out on youtube!