
How to paint a skoolie? Like eating an elephant: one bite at a time.
And, indeed…adding school bus paint feels like eating an elephant! (And that’s just to start painting…not counting the entire bus conversion!)
But the paint job had to be done. It just couldn’t stay school bus yellow! Besides, I was jealous of seeing all those cool bus paint jobs out there!
Should I Paint my Skoolie?
Laws
Most state laws require changes in school bus paint. Alaska, for example, states that “A bus originally painted and used as a school bus which is no longer used as a school bus must be painted a color other than National School Bus Chrome Yellow before it may be driven on a highway or vehicular way.”
Simply removing School Bus signs, flashers and the “butt-whacker” don’t quite cut it as a full bus conversion!
Moreover, rust attacks old school busses, so beginning your bus conversion by preparing and painting them provides you with an opportunity to give them a new coat while reflection your personality.
So giving skoolies paint jobs is highly recommended!
Prepping for Skoolie Paint Job
I’m not going to lie to you.
Prepping sucks.
I would almost”¦(almost…not quite) attend a faculty meeting. We found painting the entire bus long, laborious and tedious at best.
But, in reality, school bus conversion often involves 70% tedium and 30% exuberation.
In my good moments, I treat the process like a Zen Master…in “the zone,” one step at a time. Usually with music blasting.
In my less actualized moments I mutter and curse.
Just be ready for the long process of getting ready for the skoolie paint!
Rust Remediation
First, we removed as much rust as possible. We ground down to metal in a few places, then treated the area with this rust converter.
Sanding
I don’t know exactly how long it took to sand the bus because I spread it out over the entire winter. When I had a few moments and didn’t know what else to do I grabbed my Milwaukee orbital sander, some 80 grit sanding pads (and often a beverage) and spent 30 minutes removing the sheen from the paint.
Most people use a finer grit. However, I thought that 80 grit would make the job go faster. I figured I would prime and paint anyway, so deeper scratches wouldn’t affect the final look.
By the time this fall rolled around, I had completed most of the flat surfaces of the skoolie. To attack the more uneven surfaces, I began with a sanding block. However, I discovered that just just using my hand gave me more flexibility to get around the curves. (Hey…we’re talking sanding here not Julie!)
I took a full sheet of 8 1/2 by 11 sandpaper, but it in thirds, then conformed my new piece around the profile of the chair rails and more of those hard-to-reach spots.
Be aware that paint does not hide imperfections! In a few lumpy spots I thought, “Oh, the Skoolie paint will hide that.”
It won’t.
So, while it’s darn near impossible to make the surface of an old school bus perfect, be sure that you feel happy with the surface before moving on to skoolie paint.
Decal and Glue Removal
This can be a surprisingly tedious and difficult part of bus conversion! Be prepared!
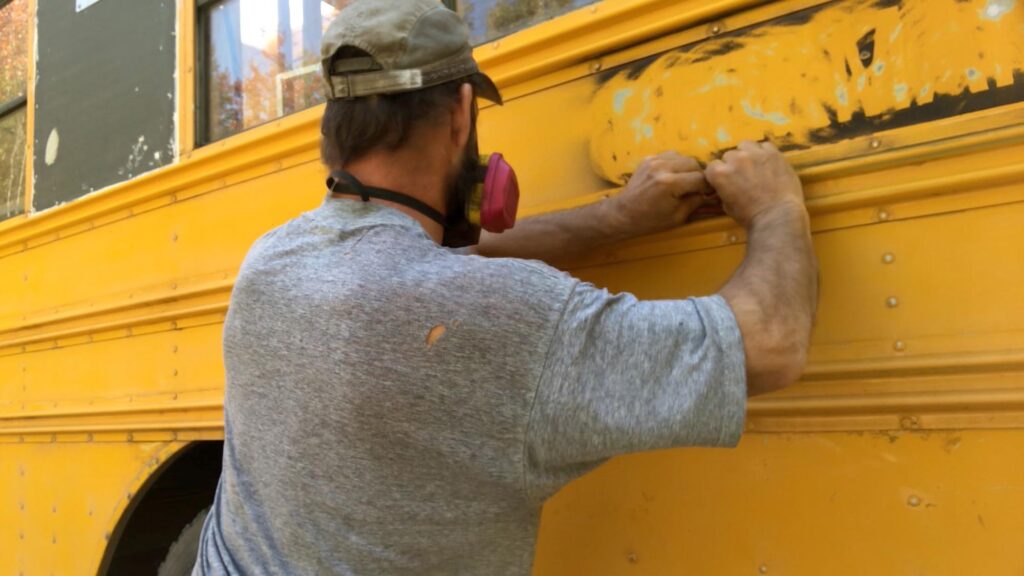
I had used either a blow torch or a heat gun and a 5 in 1 painter’s tool to remove the decals and reflective tape. (A previous owner had covered a lot of it with black paint). I used a combination of Goo Gone and Paint thinner to work off the glue residue.
Many people have said that they found the eraser wheel method effective. I found, however, that the eraser wheel only worked on easy to remove decals. The more stubborn decals simply chewed through wheels. A quick blast from a blowtorch and simply peeling off decals worked faster.
I had to work harder at the reflective tape! AFTER I had removed it all, (unfortunately) I saw a social media post where someone had used a multi-tool and a scraping blade which made quick work of the stubborn stuff. I wish I had thought of that!
(Edit: I ended up buying a multitool and used it on the reflective tape on my daughter’s bus…it works great! It’s also great for removing the seam sealer along the inside edge of the floor and walls!)
Washing
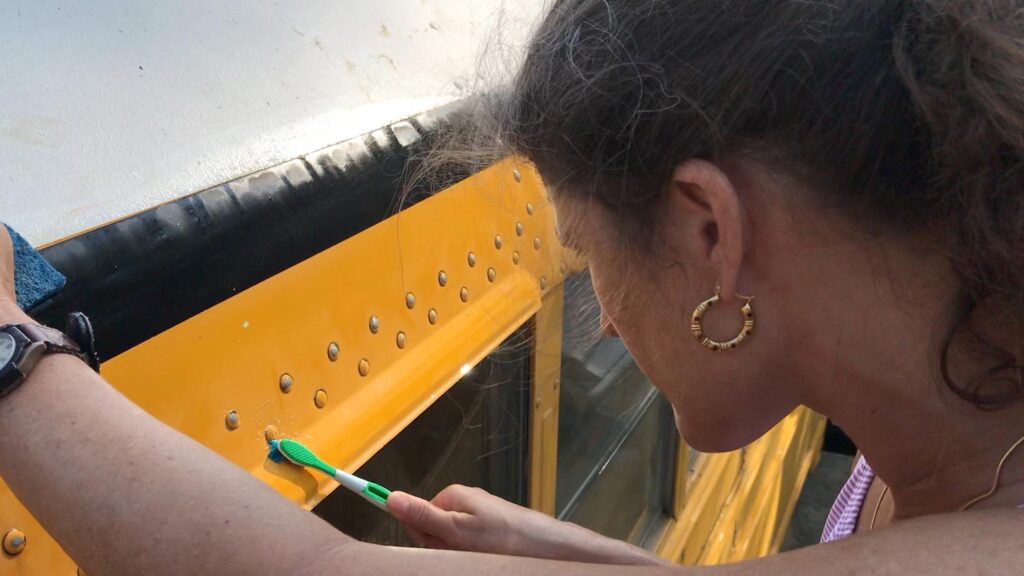
To remove all the sanding dust and Goo Gone residue, I soaked the entire exterior with a hose, then scrubbed it down with a brite pad and Simple Green degreasing detergent. Julie slaved away with a toothbrush scrubbing all that dirt out from around the rivet heads. (They are now cavity free. We didn’t floss them, though”¦) After a final rinse with the hose, I waited for a couple of hours for the sun to climb high enough for drying the bus.
I did find it frustrating that water kept dripping down from underneath the chair rails. Clearly this happened in the skoolie’s former life because someone had applied silicone sealant to the tops of the rails. I removed the silicone so that paint would stick there, but now trapped water would suddenly free itself and drip down the side of the bus.
I ended up using a heat gun and a towel to eliminate the drips but they created a nuisance!
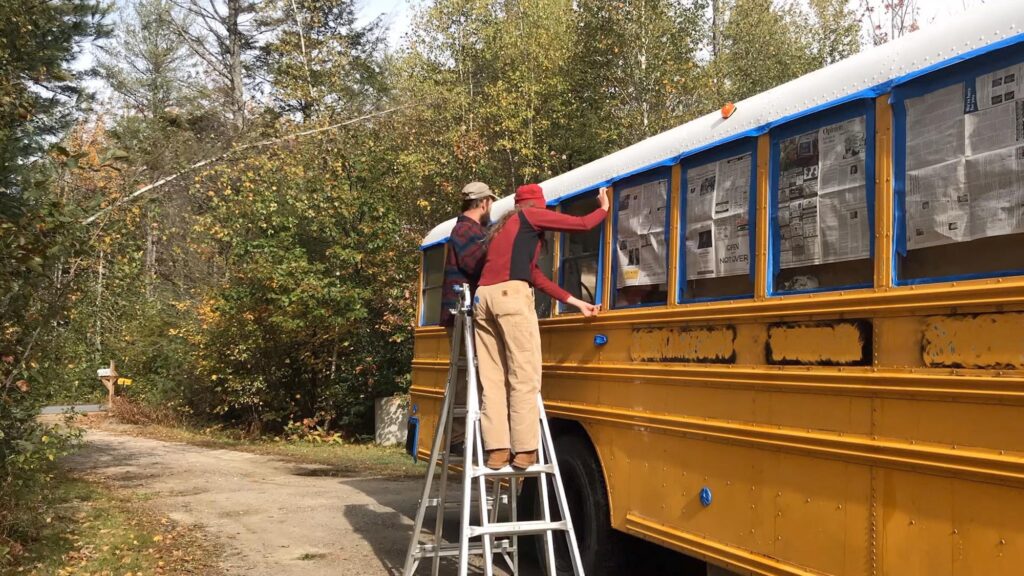
Masking
Then came the tedious task of masking. We blasted through 3 1/2 rolls of 2″ painters tape. We put a border around all the glass, then added a sheet of newspaper for all the windows, windshield and door.
I removed as many external “obstructions” as feasible such as handles, the hood latches, the rear directionals, taillights and backup lights. Had it been feasible, I would removed the running lights but they were crimped into place so I would have had to cut the wires. Also, taking off the mirrors would have been nice but the inside bolts lie buried behind stuff that would have taken longer to remove than simply mask them, so we masked away using trash bags and masking tape.
Wipe Down
After running out of masking tape, Julie headed off to grab more. (It’s never an OFFICIAL PROJECT unless you take multiple runs to the hardware store.) While I waited I wiped down the bus with rags and acetone getting ready, at last, for the paint phase!
Priming the Skoolie
At first I debated the necessity of using a primer. The skoolie already sported a factory sprayed primer and base coat. Why would I need to waste time and money on a primer? In the end, since others had done it and like the results so an extra day and $35 couldn’t hurt.

We chose Rustoleum Rusty Metal Primer. I’ve used rustoleum on the skoolie floor and on some repurposed camping parts and found it effective. Plus, my friends over at Harmony Express Skoolie had just used it and gave solid reviews.
The fumes from oil based paint are pretty noxious. Plus, the hardener we ended up using came with some pretty strong warnings about the toxicity of the fumes, so I used my respirator with a paint sprayer for painting the bus.
At first, I mixed 4 parts primer with 1 part acetone. However, I found that the Harbor Freight paint gun liked a thinner mix. Heavier mixes splattered and clogged the spray gun, however the thinner mixes went on well.
I thought that the prep phase would proceed slowly but painting would go fast. Wrong. I began spraying primer at around 12:30 and didn’t finish until 5:00. And I was tired!
Sanding
The next morning I awoke (surprisingly sore) and sanded the primer coat. Again, I wondered at the necessity of this step, however, I did find some high spots from splatter. So I used a drywall sanding sponge to smooth the surface for the final coat of paint.
Once again I hosed down the bus and waited for it to dry.
Skoolie Paint at Last!
Choosing a Skoolie Paint
In the old days of whitewater rafting, a lot of company owners bought old school busses to transport guests to the river. The solved the paint job problem by buying a bunch of rattle cans of spray paint, several cases of beer, and turning the job over to a bunch of thirsty raft guides.
I actually considered the option…briefly. But I wasn’t sure how durable spray paint would be. So looked for something that I thought would be more durable.
We chose Rustoleum Tractor and Farm Implement paint. It really came down to recommendations in the skoolie community. People in forums and social media had used it and posted satisfied reviews…folks said it had done a nice job. We chose International Harvester White…which seemed closer to an almond color to me.
Paint Design
I’m not an artist, so I found it tough to come up with skoolie paint ideas. Many people use multiple color accents to give their bus pizzaz. We hope to use graphics rather than shapes and lines to create personality. While we lack artistic talent, our friends do not! Thus, at some time in the (we hope) not-too-distant-future our friends will create landscape silhouettes that will reflect our skoolie inner spirit!
Applying Skoolie Paint
I like the look of a sprayed paint as opposed to a brushed or rolled on look. It seems that I can never get out the nap or bristle marks from the final coat. So, like the primer coat, I used a spray gun.
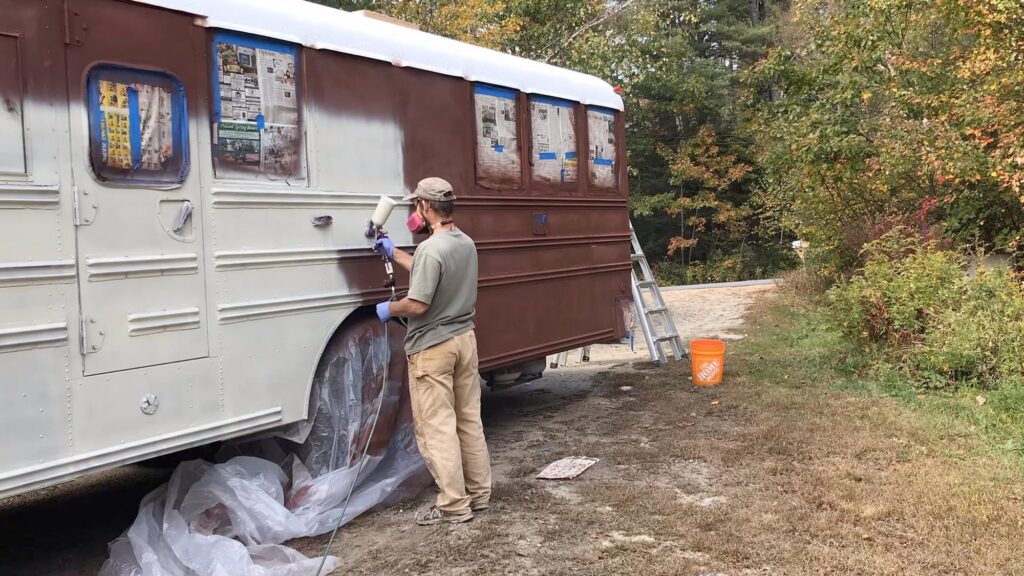
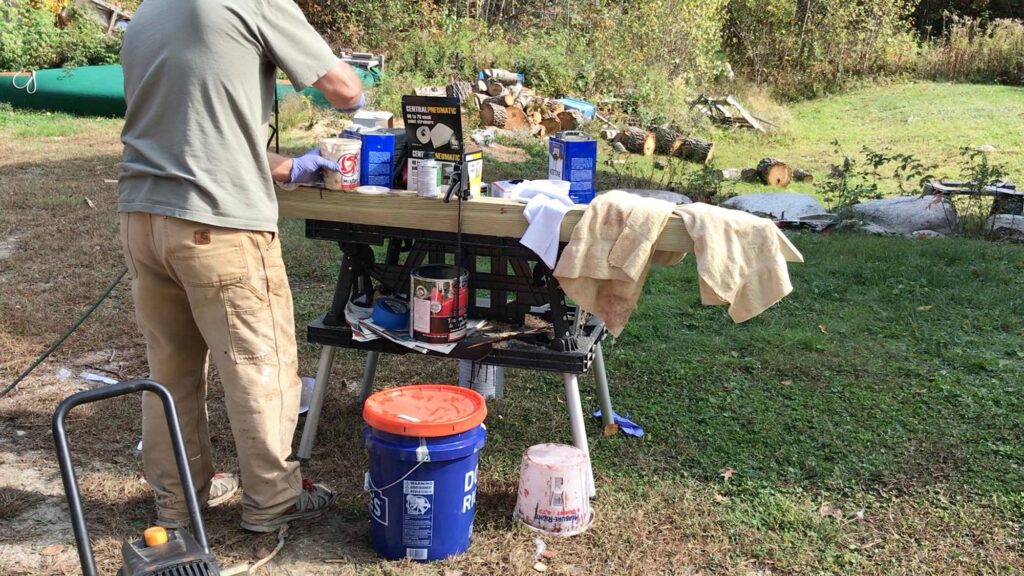
Like the primer, I used 4 parts primer and a little over 1 part acetone and 1 part majic hardener. (The directions on the paint can called for acetone instead of paint thinner). Since my paint gun only holds 20 ounces, I had to mix in batches. To speed the process, I premixed the paint and acetone in a 5 gallon bucket. (1 gallon of paint, 1 quart of acetone).
I used hardener to accelerate the drying process. And, from what I could gather, hardener creates a…well…harder paint surface. I tend to “challenge” my equipment, so anything extra I could provide the paint with to help it battle scratches I figured would be a sound investment.
I dumped in the paint and acetone and used my power drill to mix it all up. Then, I poured 16 ounces of that mixture into a paint mixing cup, added 4 ounces of hardener, 2 more ounces of acetone for a thinner mix, and stirred it up. I poured this mixture into a disposable paint gun cup and let the paint fly!
I completed the first coat moving side to side. (With the paint gun nozzle in the horizontal position giving me a vertical spray pattern). It took me a couple of hours to move around the entire bus.
By the time I had moved around the bus the paint where I started had already dried. I could still see some splotches of primer through the first coat so I opted for a second. This time, I turned the gun nozzle to the vertical position and sprayed in an up and down pattern. I hoped that cross hatching the patterns would avoid splotching. (Which appears that it did!)
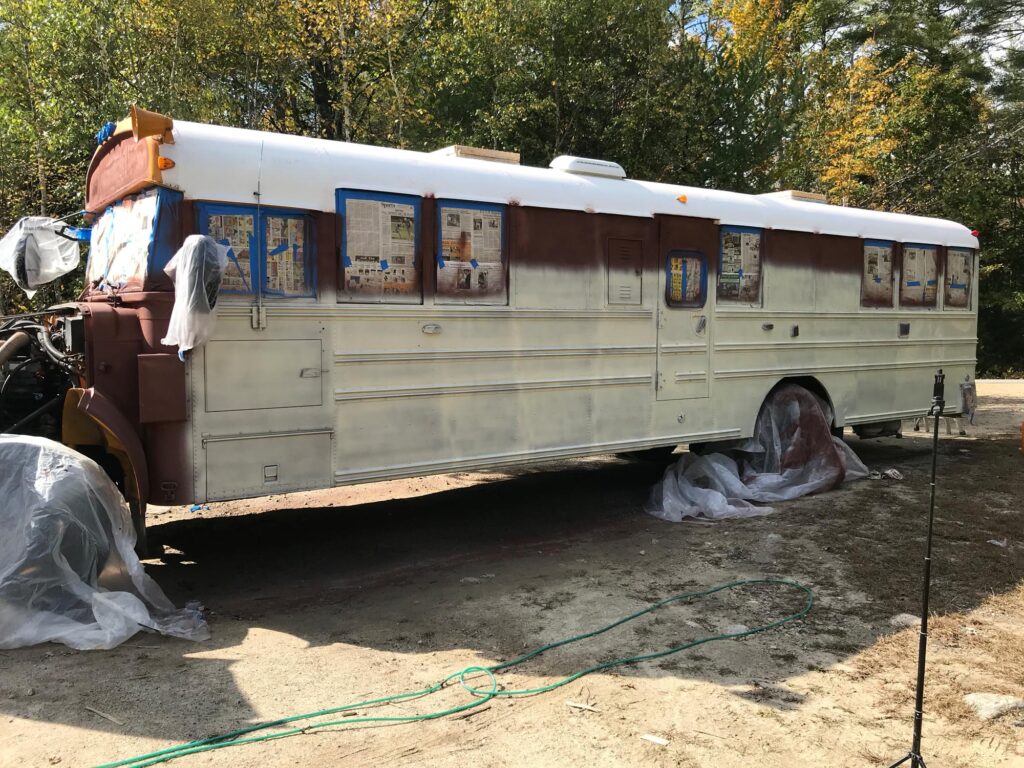
It took me another couple of hours to finish. By this time I was pretty tired!
I debated adding a clear coat…and I still might. However, we have a few artist friends who plan on adding some style! So we’ll hold off on the clear coat for now.
Removing Masking
In using latex paints in rooms, I have found removing painters tape before the paint dries lowers the risk of peeling back the paint. Automotive paint sites recommended leaving tape on for a few hours.
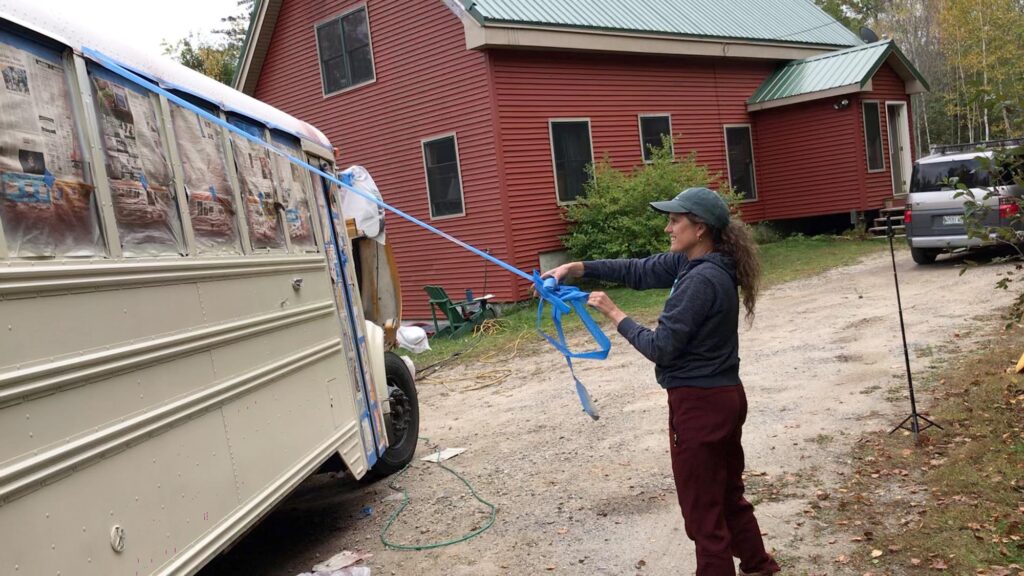
We decided to remove it right away. Partly because that’s what we always do and partly because we were tired at this point and wanted to finish the project, briefly admire our work, then grab a beer!
The paint coat did not suffer in the masking removal process, though we had to use caution not to drop used tape on the not-quite-dry parts.
Voila! It no longer looks like a school bus!
Skoolie Paint Conclusion
Painting a skoolie takes a long time! Both the prep and the paint process demand hours of tedious attention to detail! However, it satisfies many state law requirements and provides you with an opportunity to make your bus YOURS!
And, for me, visual really drove home that my bus conversion was almost complete!