
I had hoped that installing the Camplux 10l was going to be one of the more straightforward projects in the skoolie conversion project.
It wasn’t.
But then again seldom do projects bless themselves with simplicity.
However, we triumphed in the end and now can wash dishes with hot water. (The shower is still under construction!)
Choosing the Camplux 10l
We wanted a propane on-demand water heater. We simply don’t currently have, or plan to have, oodles of electricity to power multiple appliances.

However, we live in the Northeast.
And while we plan on running away from extremely cold weather at some point, we also imagine it likely that we will find ourselves in some cool weather in the spring and fall.
Many on-demand propane water heaters can only raise water temperature 40 degrees. If your ambient temperature is 80…that’s great.
However, we took the bus out last weekend and the temps dropped into the 20’s that night!
In addition, Julie and I both really enjoy hot showers. In a skoolie we can’t really camp out in the shower and blow through all that water. At the same time, however, after a day of paddling in cool temperatures, a hot shower feels really nice!
So, we needed a hot water heater with some gusto!
Then came the bargain hunting.
Water heaters litter the market. But, like always, sifting through the myriad of products to find one that met our needs and didn’t smash the budget always creates the challenge.
I found our Camplux 10l on their webpage in the refurbished section for $150. (As a side note…I actually like refurbished and scratch and dent stuff. Then I don’t feel so bad when I scratch and dent it myself which is always bound to happen.)
Installing the Camplux 10l
I ordered the water heater, but didn’t order the thimble for the exhaust thinking it would be easy to find one locally.
I was wrong.
Dead wrong.
Big box stores didn’t have them.
Local hardware stores didn’t have them.
RV stores looked at me funny and said “We’ve got nothing like that.”
So I went back to the website to order it. It wasn’t available for 2 months.
Grrr…And other assorted invectives.
I ended up ordering it and waiting. It really wasn’t critical; I didn’t plan on really needing hot water for several months, but it would hold up the process.

So the lesson here: order your thimble!
So, I started the installation process during the rough plumbing stage of my build. I also had to “rough plumb” the heater as well. Which meant I ran the plumbing NEAR the heater, but couldn’t really hook it up until I resolved the GREAT WATER HEATER THIMBLE DEBACLE!
Plumbing the Camplux 10l
Running the plumbing actually was relatively simple.
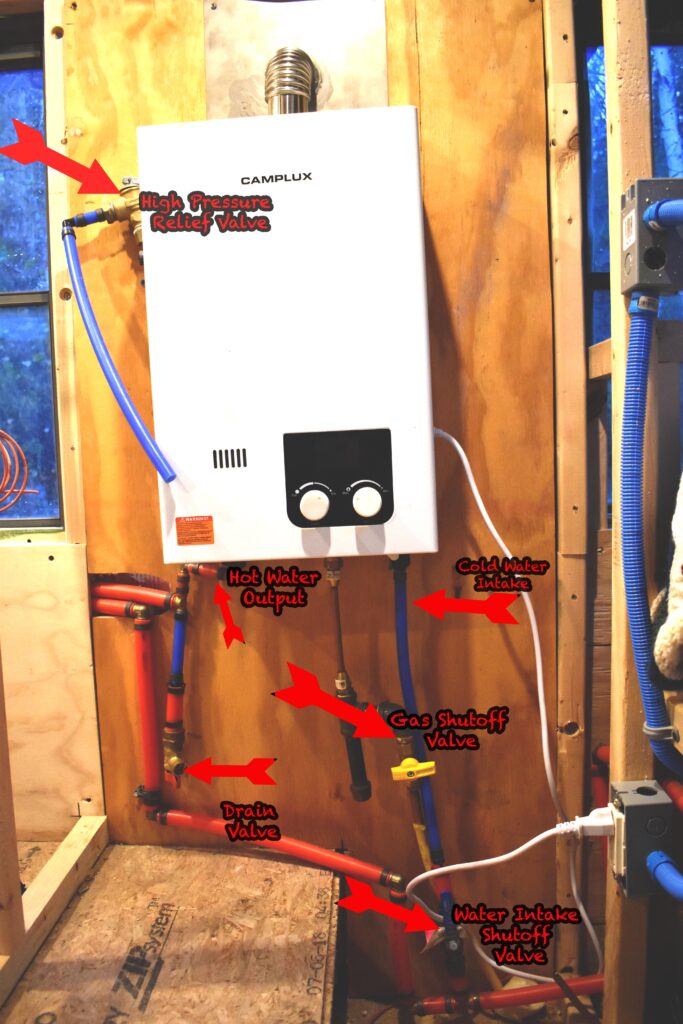
Using pex tubing, a pex cutting tool and a crimper, I ran a cold water supply to the inlet.
I ran the outlet, again using pex, to a T. From one side of the T I went up to a pressure relief valve the other side of the T dropped to another T. From that junction, one leg ran to a drain valve, and another leg to the hot water supply lines of the shower, the bathroom sink and the kitchen sink.
Installing the Camplux 10l Thimble
Using a hole saw I cut a hole through the skin of “formerly-a-window,” through the insulation and through the interior plywood. I squeezed a layer of silicone caulking around hole on the exterior sides of the thimble and used sheet metal screws to secure it in place. (I gobbed some caulking in the screw holes as well).
Next, I inserted and secured the interior thimble section with screws to the plywood.
So far so good.
Which is always a bad sign.
The thimble base covered the place where I needed to screw the actual heater to the wall, so I would have to drill through the thimble base to install the screws. I don’t want to complain about the ruggedness of materials, but none of my drill bits were sharp enough to punch through the stainless steel.
It was turning into another one of those projects that I thought would take 20 minutes that…well…wouldn’t.
I turned to the grinder and ground groove cuts deep enough into the metal that I could punch a drill bit through. With that done I could finally install the screws and hang the water heater.

Installing the Exhaust Vent
The Camplux water heater came with a horizontal exhaust vent. Which is great…except I needed to vent it vertically. Unfortunately, they didn’t include one. And trying to stick the horizontal one through extended about a foot outside the bus. That’s WAY too easy for me to knock off with a tree branch.
I asked several RV stores and they offered no advice until I got to Lee’s Family RV Center. They were super friendly and super helpful! They suggested cutting the pipe then borrowing an exhaust expander from O’Reilly’s auto and connecting the two ends back together.
Their plan worked brilliantly after a trip to the autoparts store.
(Remember that part where I hoped this would take 20 minutes?)
I stuffed the vent through the thimble and used sheet metal screws to secure the end to the heater. Now I faced a 1/2 inch gap between the pipe and the thimble walls that I was sure would be exploited by cold and insects. Both of which would bite.
It seemed too big of a gap to seal up with just caulking, so I stuffed some rockwool insulation in there then sealed the ends with some fireproof caulking.
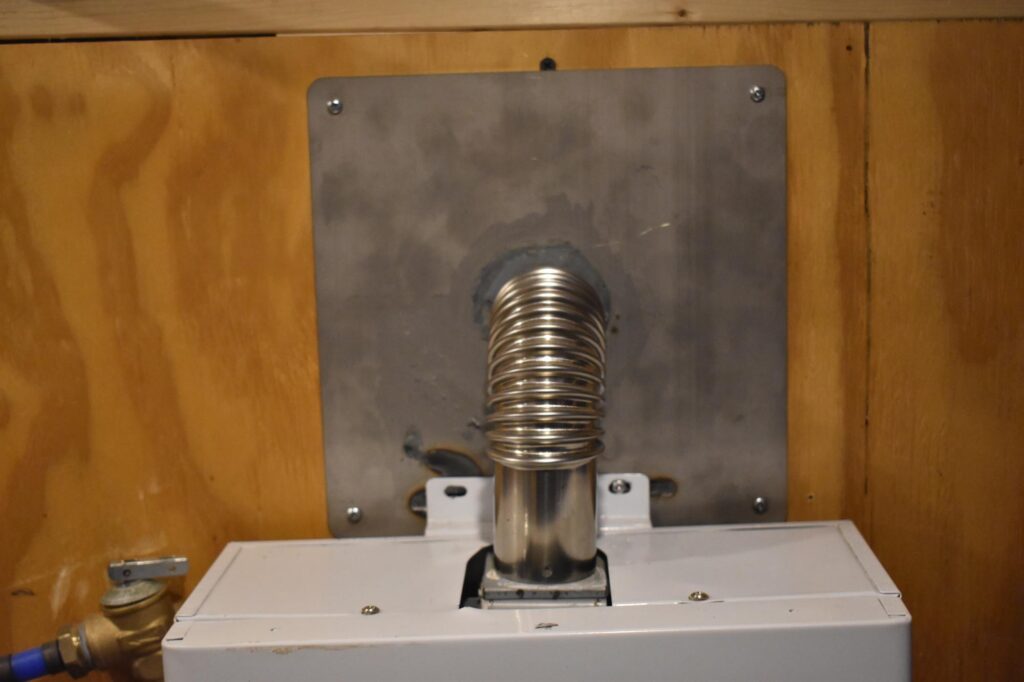
This strategy worked marvelously well. Better than anything else on this project actually!
Electrical Power
Although the heater runs primarily on propane, it requires a 120 Volt connection to run the display and to fire the ignition. I find this annoying because other models utilize D cell batteries, thus don’t require a shore power source or an inverter. But, I liked the price point. So, I had to install a GFCI outlet near the heater.
Firing up the Camplux 10l
I was ready.
Plumbing plumbed.
Electricity wired.
Thimble thimbled.
I turned on the water and gas valve, stood optimistically by the sink and turned on the hot water. Peeking around the corner I peered at the display on the heater.
Nothing.
No hot water at the sink, either.
Dagnabbit.
Troubleshooting
I had gas, water and electricity going to the heater so it should have been firing.
I wondered if somehow the faucet created the problem. Perhaps the mixing valve somehow choked off hot water supply. I hadn’t yet installed the bathroom sink, so I grabbed a bucket and opened up the hot water supply line.
Whoosh! The water fan kicked on, the display started flashing increasing numbers, and, most importantly, hot water surged out of the supply valve!
I disconnected the supply line from the kitchen sink and repeated the previous steps. Yup..hot water!
Okay…so the heater wasn’t the problem. Somehow the faucet interfered.
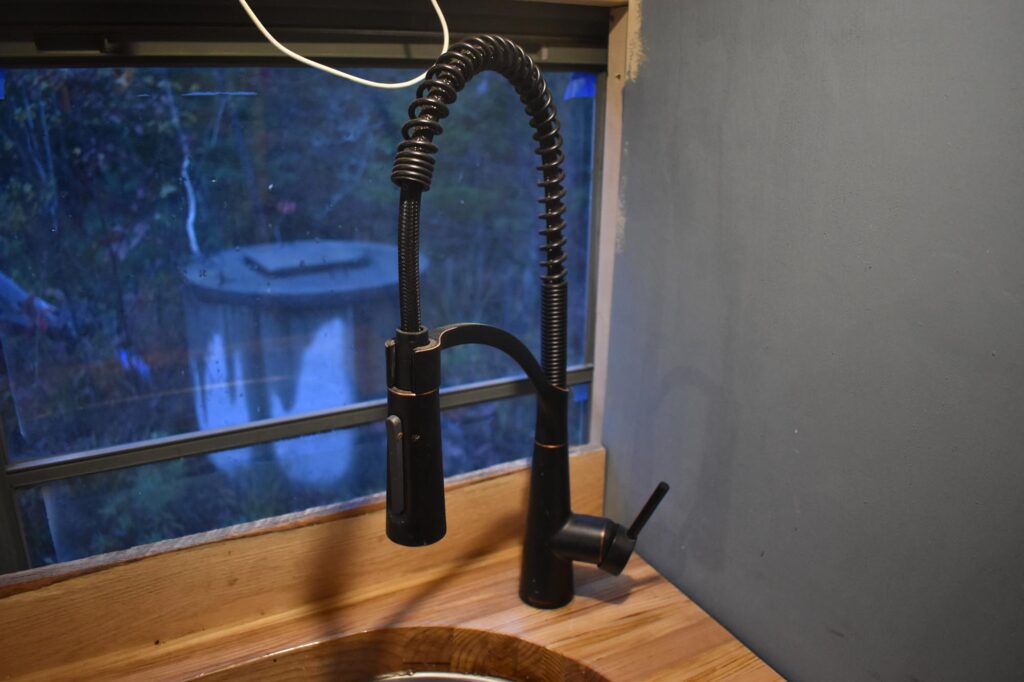
I removed the faucet and took the whole thing apart thinking that the cartridge was blocked somehow or that the mixing valve was broken. Everything seemed normal.
(These kinds of challenges seem to plague me every which way!)
Off to Mr. Google.
As it turns out, several people have experienced similar issues with on-demand water heaters. Many heaters require a minimum flow in order to fire in order to avoid getting air in the system which heats to quickly and too hot and burns out internal heater parts. (Ever turned on an electric water heater with an air bubble in it and fried the elements?)
The faucet’s lower flow prevented the heater from reaching flow levels allowing it to fire.
Rats.
We liked that faucet (and spent money on it.)
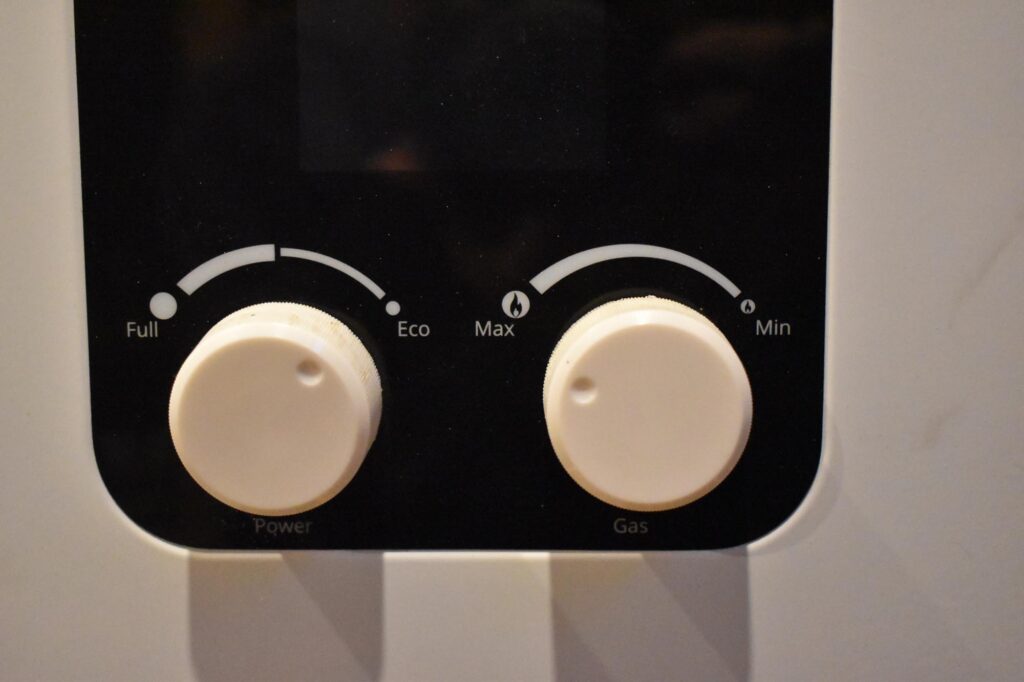
So I started monkeying around with the settings on the heater. We found that by turning it to eco mode that we were able to get the heater to fire and still get water temps up to 125 degrees.
Conclusion
I did like the price of this heater. For an indoor heater that (potentially) cranks out that much hot water, I like it.
And it works! I used it all summer and we found it particularly useful on our chilly bus life weekend!
I found it finicky, however. Wrestling with the thimble and having to fine-tune the settings to work with a typical kitchen water faucet gave me more headaches than I wanted.
Was it worth it?
Good question.
I’ll keep you posted after we get the shower built.
Stay tuned!
Ted
You can see how this hot water heater ties into the tile shower here!