
I had originally thought to keep our original skoolie door. Conventional doors on a school bus conversion just looked weird.
But little barbs kept poking at me and I questioned the wisdom in this decision.
I didn’t seem to mind the one inch gap at the bottom of the original door at first. But then came mosquitoes. Then cold. And noise when we drove.
Then I began to wonder, “How will our skoolie door lock?” Where we are NOW doesn’t matter much; I leave my keys in the ignition so I don’t lose them. But in other parts of the country that might not be such a good idea.
So we started looking around at skoolie door ideas. Some people bought and installed conventional exterior doors as their skoolie door replacement.
Others modified the existing doors making them tighter and more secure.
I still didn’t really like the look of them.
But after a chilly weekend, winter approaching and the thought of little beasty mice having mouse parties in our cupboards spurred me on to take some sort of action on the school bus door front.
A friend of mine had given me several RV windows. I had thought about replacing some of the regular bus windows with them, but had passed that phase when I picked up the windows so had them kicking around for “ome project down the road. (“down the road,” get it? Sorry…moving on”¦)
I also had some 2 inch oak left still in my “free rough sawn lumber” pile. The two must be married, I thought. Thus began my custom skoolie door project.
Milling Lumber
Live Edge Sled
A few of the rough sawn pieces had not been edged; thus they still had crooked live edges that needed to be straightened.
I used a sled that I use to cut angles (or live edge pieces) on a table saw. Using this technique I was able to get one straight side.
Jointer
Next, I ran the bottom face through my jointer. I pressed the edge that I had just cut on the table saw against the fence and the jointer flattened the bottom at a 90 degree angle to the original cut.
My jointer is short and narrow, (I can’t afford a larger one!), so I don’t get the edges perfect, but they’re close and much better than they were before!
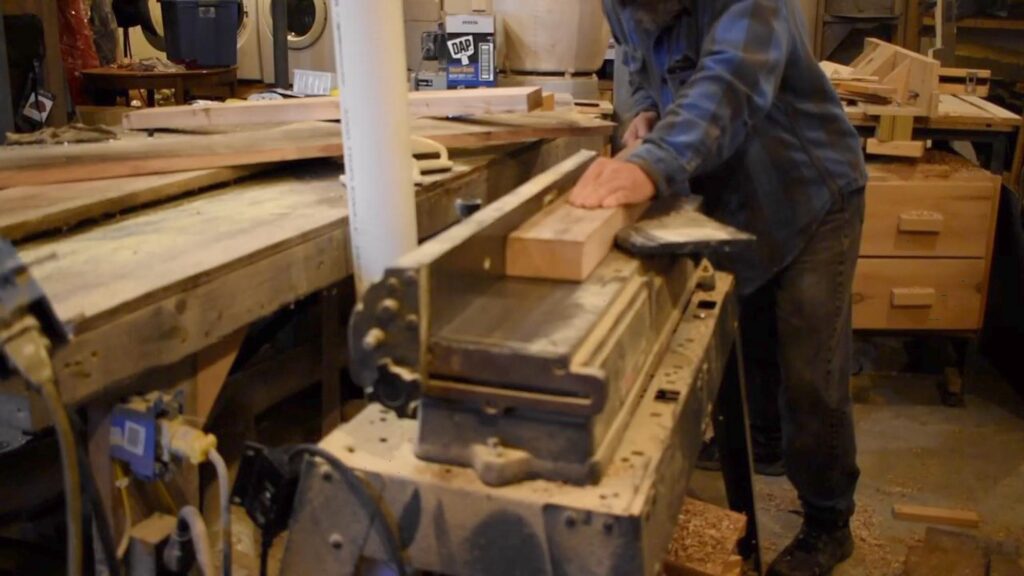
Planer
I took the sawed and jointed pieces outside to my planer. Since the planer is much more portable than my jointer and table saw, I let chips fly outside where I don’t have to do as much clean-up.
I wasn’t concerned with exact thickness. Since I was custom building this door, the components could be almost any thickness within reason. I wanted the outside frame to be around 1 1/2 inches with the inside panels around 3/4 of an inch.
Really I just wanted to get down to “good wood” with smooth, attractive features. This wound up being 1 â…” for the frame and 13/16″ for the panels.
Mortise and Tenon Joints
I knew I wanted (needed?) a strong door. We subject our bus to bumpy dirt roads and I couldn’t have a weather / insect barrier coming apart while lurching over roads.
Both sides would be exposed as well, so my trusty Kreg Jig was out of the question.
And, while I felt that I could tongue and groove the panels that held the windows, I felt like I needed something stronger for the Rails and Stiles of the door. So I opted for Mortise and Tenon joints here.
I find tenons fussier to dial in than mortises, so I opted to cut them first so that I could make the mortises fit the tenons rather than the other way around.
Sizing Mortise and Tenon Joints
As a general guideline, a tenon should be â…“ of the stock’s thickness and, in length, between 1/2 and â…” of the width of the piece that it will be joined to.. Since my stock was a little over 1 1/2 inches, I made the tenons 1/2 inch thick. I would have liked to have made the tenons longer, but since material was getting tight, I made the tenons half the width at 2 inches.
Cutting the Length
I used a tenoning jig on my table saw to make the end cuts first. Clamping the piece vertically in the jig, I made one pass to cut each side to length.

Cutting the Shoulders
After performing its duty well the tenoning jig went back to it’s spot on the dusty shelf and I used my table saw sled to cut the shoulders.
I set the table saw blade depth to an intersection with the depth cut. Then, I clamped a stop block on the sled and cut the shoulders on each tenon.

To get the tenon edge thin enough to slip into the frame grooves, I used a dado stack on the table saw, set the depth to 1/2″ and ran both sides of the panel through the saw. This left me with a 1/2″ tongue.

Cutting the Mortises
I needed to create a “2-tier” mortise system. I wanted a 1/2 groove to house the tongue from the window panels, but a 2″ mortise for the rail tenons.
I normally use a bit set on my router table to cut tenons and grooves for cabinet doors. However, they only work on 3/4″ stock. So I opted to use my dado blade set to cut a groove in the rails and stiles.
I stacked blades to the thickness of the tenon and set the depth to 9/16 of an inch. (I like to give myself a little extra room for glue).

I set the stiles on the table saw and lined up the fence so that the groove would align with the tenon. Using a piece of scrap I cut a groove and checked it with one of the tenon pieces. I made a few adjustments until both sides matched up perfectly, then marked all the edges that needed to be grooved, then cut them.
To cut the deeper mortises, I started at my drill press. With a 1/2″ drill bit in the chuck I clamped a fence to the drill press and set a depth to 2″. Having already marked the location of the mortises, I drilled out as much material as possible.
To clean out the “rounded” material, I used a chisel and a hammer to knock out any remaining wood in the mortise.

Building the Window Panels
I knew I would cut out large ovals in the panels to hold the RV windows and I wanted to save wood. So I made the panels by gluing long pieces of 3/4″ oak on the outside edges and shorter pieces in the middle. One the glue dried I traced the window shape on the panel and used a jig saw to cut them out.
Assembling the Skoolie Door
Now time for the moment of truth. This part always stresses me out because it reveals my errors and failures. Whether the surface as design flaws, forgotten details or math mistakes, they always show up here.
In this case I had made a couple of errors, but they were not fatal. For some reason, the lower the second mortise from the bottom didn’t line up perfectly with the tenons. Somehow the panel fit differently when installed so I had to make the mortises a bit longer.
A few of the tenons also fit a little too tight. (“A bit dry,” said with a thick Maine accent best captures it). So I used a chisel to scrape away a bit more material on those offending tenons.
After the dry fit determined that the door would, indeed, go together I smeared glue on the tenons, poured glue into the mortises, then used a hammer and a wooden block to tap everything together.
Checking for square by measuring the diagonals, I banged the corners into shape and clamped the door together.

Finishing the Skoolie Door
Sanding
No matter how hard I try to get perfectly flat glue-ups, I always find a few uneven surfaces. So after the door had dried overnight, I used a belt sander to remove excess glue and knock down uneven edges. I progressed from 80 grit to 120 grit. At this point I switched to my orbital palm sander (80 grit to 120) to work out the rough scratches left by the belt sander.
Raising the Grain
Before moving to 220 grit, I wiped the door with a wet rag. This accomplishes 3 things:
- It removes sawdust
- It shows glue remnants. Excess glue will affect the way the final finish. It can be tough to see left over areas of glue but water will discolor it so I can find it and sand it off!
- It raises the grain. When exposed to liquids, the wood fibers will stand up leaving a “fuzzy” feel. They only do this once, however. So, raising the grain at this step allows me to hit it one final time with 220 grit sandpaper and it will STAY down rather than rising up with the first coat of finish.
After sanding and wiping one final time, I was ready for Spar Varnish.
Varnish

Since the elements will relentlessly attack this wooden door, I knew I needed a resilient finish. Polyurethanes don’t really have the “solids” content that I wanted for protection, so I chose an oil-based spar varnish.
I love the look and performance of oil-based finishes but hate the clean up and dry time. I’ll bet I ruin a couple of paint brushes a year because I can never get them clean enough. It also takes forever for coats to dry and cure. With shellac or water-based urethane (especially sprayed) I can recoat in 20 minutes rather than 24 hours!
Anyhoo”¦
I put a coat of varnish on…waited a day, added another coat…and repeated until I reached coat number 5. At this point, I sanded with some 220 grit to knock down some “fuzzies” and added one final thin coat.
I really considered fine wet sanding with some 2000 grit polishing pads but I wanted to get the door on so I postponed that strategy for now.
Putting on the Door Sweep
In order to keep out all sorts of vermin, weather and offending air, I installed a door bottom or “sweep” if you want to call it that. It came in a 36″ piece so I cut to size and secured it to the door with the screws that came with it.
Installing the Doorknob
We decided on a lever type knob just for the aesthetics of it. It came with a template for drilling holes in a “new construction” project, so I laid the template on the door, marked where the holes should be, then drilled a 1/2″ pilot hole.
The knob called for a 2″ hole, so I pawed through my hole saw collection and found 1 3/4 and 2 1/2 but not 2″.
Of course.
So off to the hardware store for a 2″ hole saw.
Upon my return I drilled the hole for the knob and also the 1″ hole in the side of the latch, marked where the latch plate would sit and the screw holes, then predrilled the screw holes and chiseled out about 1/16″. Setting the plate in place I screwed in the latch, then inserted the knob and screwed the two sides together.

Installing the Door
I found installing the bus door more of a challenge than installing conventional doors. In normal construction you have room around the door rough opening. And especially with pre-hung doors you can slide the door in, level the top with shims, plumb the sides and shim if necessary. Moreover, the opening is usually square and the studs forming it are 90 degrees to the opening.
None of this was the case with the bus.
The opening itself was relatively square, but the sides…the “jambs” per se, are curved. To add more demonic difficulty to my spatial-challenged brain, these jambs flared out at the end so not square.
@!#!@@.
I found it difficult to get a precise measurement of how big the rough opening would end up end up being after I built and installed the jambs.
In retrospect, I should have build the jambs first, installed them, then built the door to fit the jamb.
I didn’t do that.
I made my life more difficult than it should have been.
Skoolie Door Jamb
Building the Jamb
I ripped down some oak to 1 â…ž”. These would serve as the sides. There was a nice little overhang at the top that had a few jags to it, but hosted another piece of oak nicely as the door top.
At the bottom I place another piece of 1 â…ž” oak. Using my Kreg jig I assembled all the pieces together then attempted to fit it into place.


It “fit.” That’s the good news.
Trying to literally fit a square peg into a round hole…that’s the bad news.
It wasn’t catastrophic, but”¦
Installing the Skoolie Door Jamb
The top and bottom fit great. But I found it tough to get the sides to sit still. I wanted them as deep in the opening as I could get them so that the outside edges would be flush. I could clamp the top and the bottom into place but the middle would bow out.
I felt like a cartoon character pushing in one spot to watch it pop out in another.
Moreover, if I tried pushing the jamb sideways against the door frame it would conform to the metal and flare out…which is no good for hinges or latches. So while the inside of the jamb rested against metal, the outside sat about an 1/2 away.
I knew that if I bolted it as it was the door jamb would flare, so I shimmed the outside with some 1/2″ pieces of oak. (I’ve yet to decide if I will cover the jam with trim like on conventional doors, caulk it, or leave it as it is.
I pre-drilled holes in the jamb. Using a large bit I made a countersink hole for the self-tapping screws, then switching to a smaller bit I drilled holes large enough to accomodate the screw shaft. Then, with an even smaller bit I pre-drilled holes in the bus door frame. (I know they are supposed to be “self-tapping” but I’ve found that giving them a little boost makes the process much easier.
Using my impact driver I drove in the screws. (Yeah…self-tapping” is a misnomer, you actually have to put them in yourself. They just lie there.)

Building the Door Stop
I had about 3/16″ between the inside edge of the door jamb and the metal of the bus door frame. I cut a 3/16 x 1″ piece of oak, applied waterproof glue to it, and tapped it into place.

Hanging the Skoolie Door
With a normal door, I would install the hinges, hang the door in the jamb, cross brace the jamb to keep in square, then slide the whole unit into the door frame. However, with the narrow jamb, and the possibility that I would keep the edge of the jamb exposed without trip, I didn’t feel like I could brace the unit sufficiently to keep it from wracking.
So I marked the location for the hinges, pre drilled screw holes and used a router to notch out material allowing the hinges to sit flat.
I screwed the hinges to both the door and jamb, then hauled the door out to the bus, set it in place on the hinges and dropped the pins into place. (It wasn’t completely that easy…I had to push, pull, wrestle it a bit, then take a hammer and tap the pins into place.
Installing the Skoolie Door Catch
With the door in place I checked to see if the door would close.
Not quite.
The top edge hit against the top jamb. So I shimmed out the top jamb a bit which lowered the door swing and allowed it to close.
I marked where the latch would match up with the catch on the jamb and where the screws would go. I also measured the distance from the outside edge of the door to the main latch bolt…which turned out to be 1/2 inch.
I measured 1/2″ from the outside of the jamb and marked a line where I would align the catch edge. Using a chisel I knocked out a notch deep enough to hold the catch flush against the jam, then screwed it into place.

Putting Weatherstripping on the Skoolie Door
I peeled the backing off some self-adhesive MD weatherstripping and stuck it into place along the door stop along the sides. At the top, I stuck a piece of weather stripping on a section of 3/4″ oak, applied glue to the top, and after closing and latching the door, pushed it tight against the door and nailed it into place with 1″ finish nails.
Custom Skoolie Door Conclusion
I’m super stoked with the way it came out! I love the rustic look of the oak door and black RV windows. It seals out weather and rodents better than the original door, makes the ride quieter, and is lockable. Practicality and aesthetic appeal. Tough to beat!
Feel free to post any questions about the process in the comments. I will do my best to answer them!
Well…I’ll definitely answer them. I’ll try my best to provide the right answers!
Ted