
Let’s talk about a Diesel Heater as a primary heat source.
Because winter is coming.
Heck, it came, went to restock on icicles and stuff, and looms once again on the horizon threatening to stay through the holidays and for four months after that.
Actually I think I’d like whitewalkers more than shivering and shoveling my deck.
But I’ve still got a lot of work to crank out on the bus and I’d like some heat matching my cranking out output when it’s so cold that I need to plug the bus in to start it.
Why a Diesel Heater?
Last last fall we repurposed an old free camper found on Craig’s List. It had a working propane/electric fridge, a water tank, a propane stove and a propane RV furnace.
I had originally planned to use the RV furnace in the bus. So, I framed out a space for it, plumbed a propane line to it, then promptly used the space over warm summer months to store tequila, triple sec and margarita mix.
Alas, summer’s sweet honey breath indeed did not hold out.
On our “fall bus weekend,” temps dropped into the low 20’s!
We got chilly. Actually downright cold.

I noticed when I turned on the stove for coffee and tea that the air up around my chest grew warmer, but my feet did not. Of course I know that heat rises. However, I had hoped that mounting the propane heater at chest level, with good insulation in the ceiling, that the hot air would circulate a bit more.
Looked like it wasn’t going to.
So I looked around for another, lower spot to install the furnace.
I didn’t find one.
So I had to consider all my heating options.
I have heard that propane heaters tend to produce significant condensation while diesel heaters do not.
And I could buy Chinese diesel heaters relatively cheaply.
And they’re smaller than the 50 year old furnace.
The hot air gods seemed to be telling me something.
I ordered one.
(A quick note about a wood stove option. I’ve used a wood stove most of my life…but I didn’t want one in the bus. I didn’t want to deal with the size of the chimney, the potential insurance issues, and wood storage. And while it’s a dry heat, a small wood stove that would fit in a bus would require me to get up a couple times a night to feed it. Once I’m in bed…I don’t move much. So a wood stove was out!)
And I didn’t feel like shelling out the cash required for a mini-split.
Choosing a Chinese Diesel Heater
Diesel heaters litter Amazon. Black ones, red ones, white ones. They all look pretty much the same. I sorted by “Avg. Customer Reviews” and chose a 5KW Heater from “Happybuy”. I did like the fact that it boasted aluminum construction rather than plastic.
Probably not a big deal, but I imagined a waiter asking me, “Yeesss..you’ll be using a device that tosses out 17,000 BTU’s. Would you like metal or plastic with that?”
I’ll take metal, thank-you.
In various forums and social media groups I saw many people ask the question, “How big should I go?”
Some people thought running smaller diesel heaters on high more often would keep them clean. Others thought this strategy would wear it out.
On the other hand, running large diesel heaters on low could either foster carbon build-up, OR…it could run more efficiently.
Like many things, the point is up for debate.
Many van folks opted for 2000KW diesel heaters.
Since we have a bus with a square footage of almost 250 square feet (palatial!) AND Julie grew up in Tampa (“˜nuff said) , I ordered the 5,000KW.
Unboxing the Diesel Heater
The box came via Amazon Prime in two days.
After reading many reviews of people saying they’re heaters arrived with varying degrees of “the complete project,” opening the box felt like I had closed my eyes, thrown the dice, and was now peeking at what lay before me.
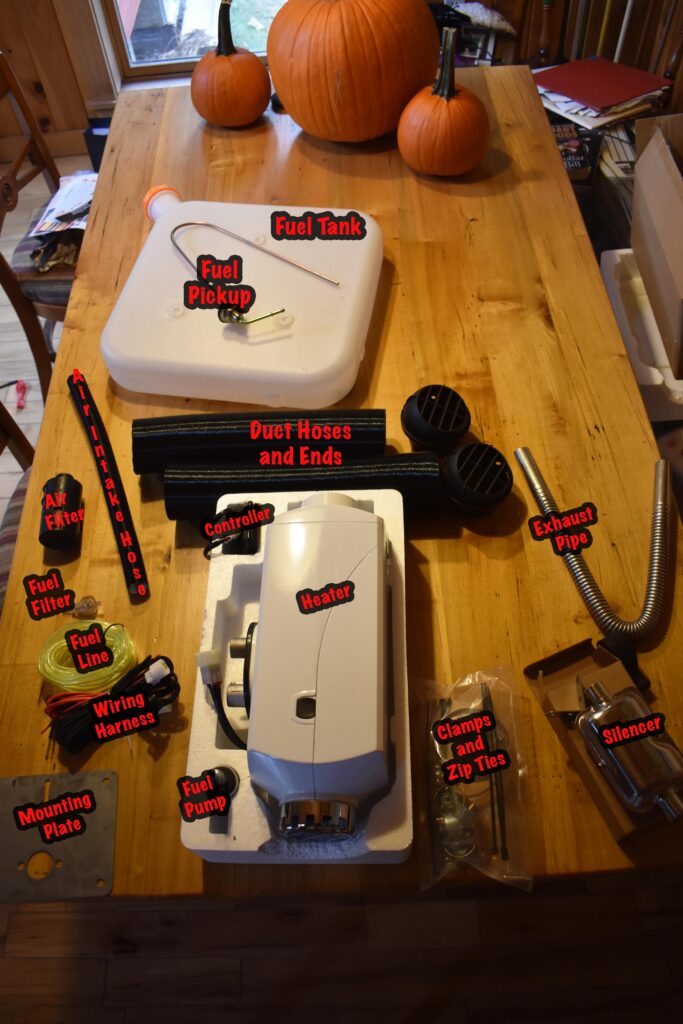
I pulled all the contents out of the box.
Okay…hoses, a bag of self tapping screws…the heater, fuel tank”¦.
No instructions. Nothing. Nada. Zilch.
I had anticipated that but somehow still found it hilariously funny.
And no “T” for the ducts. Two duct hoses, two and caps, but no “T” to divert air flow.
That’s why they’re cheap!
Installing the Diesel Heater
Cutting Holes in the Floor
I decided to install the heater under the bench seat of the “breakfast nook.” It’s as low as it can go there and the space under the bus there gives me room for intake, exhaust and a fuel tank.
Directions that I found online instructed to mount diesel heaters with a 15 centimeter clearance in front of the heater’s air intake.
I used a 2 inch hole saw to cut two overlapping holes through the subfloor plywood, foam insulation and the metal bus floor.
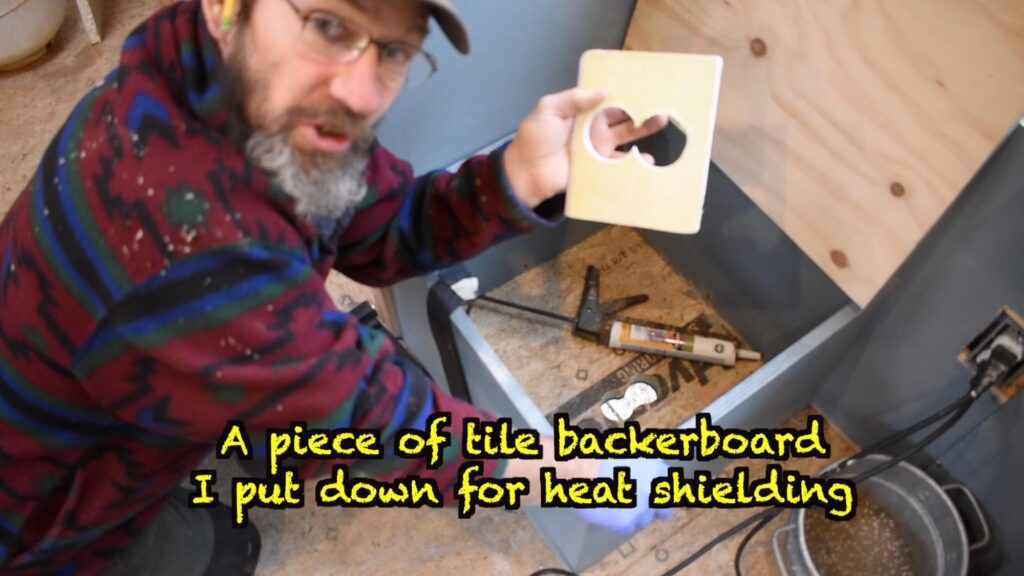
Since the insulation and subfloor came up 1 3/4″ from the metal bus floor, I couldn’t set the heater all the way down on metal. To provide some heat protection, I cut out a small piece of tile backer board to use.
(I “tested” it by holding a blowtorch to it for 30 seconds. It turned red but didn’t burst into flame. I took that as a good sign.)
I drill matching holes in the backer board.
To try and protect against moisture and heat I smeared some fireproof caulking over the exposed insulation and plywood.
I also marked where the heat outlet duct and end pieces would exit the seat box. Then I used a 3 1/2″ hole saw to make the cut.
Pre-assembly
It’s easier to flip diesel heaters upside down on a bench and connect these items looking down at them rather than lying in the dirt under the bus looking up at them. (Unless you really like dirt and an ab workout.)
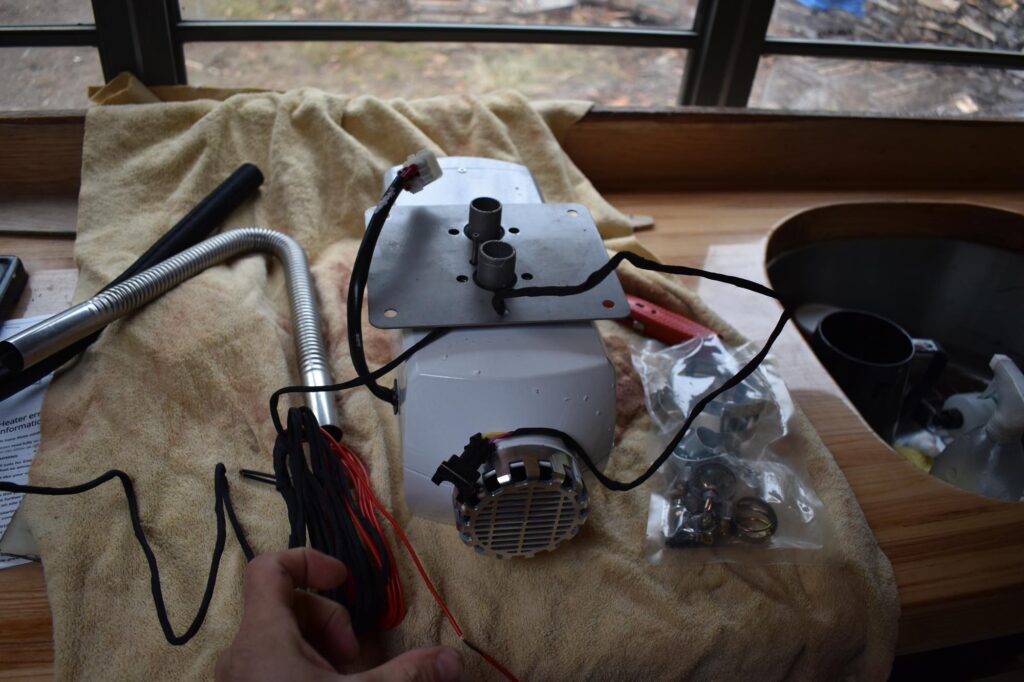
Mounting Plate
The wiring harness has 3 plugs:
- Connects to the controller
- Connects to the heater
- Connects to the fuel pump.
Good News! They only fit the plug where they’re supposed to go so you can only mix them up with violent force and breaking them!
Since I mounted my fuel tank below the bus (I didn’t want to deal with splattering diesel while refilling or a possible leak inside the bus), I needed to fish the fuel pump plug though the port holes of the mounting plate, then slide the wires into the groove adjacent to it.
I would do this BEFORE mounting the plate so you don’t have to realize these needs to be done after screwing the whole thing to the floor.
Don’t ask me how I know that.
Using the four hex-head bolts, I secured the mounting plate to the bottom of the heater.
Exhaust and Air Take Hoses
I pushed the hoses onto the ports and secured them with the clamps. The air intake, (black hose) the one closest to the fuel port, brings in combustion air..

Fuel Line
The fuel line is a tight fit! I suppose that’s good but it’s not super easy to slide that sucker on.
Be sure to slide on the pinch clamps up the line first!
I’ve heard of people rubbing a little dish soap on the inlet pipe and/or warming up the line with a heat gun helps. I found I just had to hold the line as tight and as close as I could to the inlet pipe then pushing and twisting seemed to work the best.
After getting the line onto the pipe I used a pair of needle-nose pliers to squeeze the clamp open and slide it down over the inlet pipe.
Attaching the Diesel Heater
I laid a bead of caulking around the floor holes and set the backer board on top of the caulking.
I put another bead of fireproof caulking around the outside edge of the backerboard.
Then I carefully fished the air intake hose, the exhaust pipe, the fuel line and the fuel pump wire through the hole in the floor.
Making sure that I wasn’t pinching or tangling hoses, wires and fuel lines, I used 1″ screws to screw the mounting plate through the backing board and into the advantech subfloor. (I needed to do a better job of that as you will see!)
Securing the Exhaust Pipe
Now came the less fun part of rolling around in the dirt.
I slid the muffler / silencer, with a clamp, over the end of the exhaust pipe and tightened the clamp. Where space above dictated where I placed the heater, the exhaust pipe wouldn’t reach down past the apron and all the way out from under the bus.
This makes some people nervous about carbon monoxide gas. I’ve seen several posts and videos from people who cut holes in the sides of their bus to prevent carbon monoxide from pooling up under the bus and seeping in.
I just don’t think that will happen. According to the EPA, “carbon monoxide is slightly lighter than air and…may be found with warm, rising air.” Since we will only run the heater when the air is cold, AND the exhaust pipe points at an angle toward the outside of a bus, AND we have a carbon monoxide detector / alarm inside, I feel we’ve mitigated the risk pretty well.
I did not cut an exhaust hole in the side of the bus.
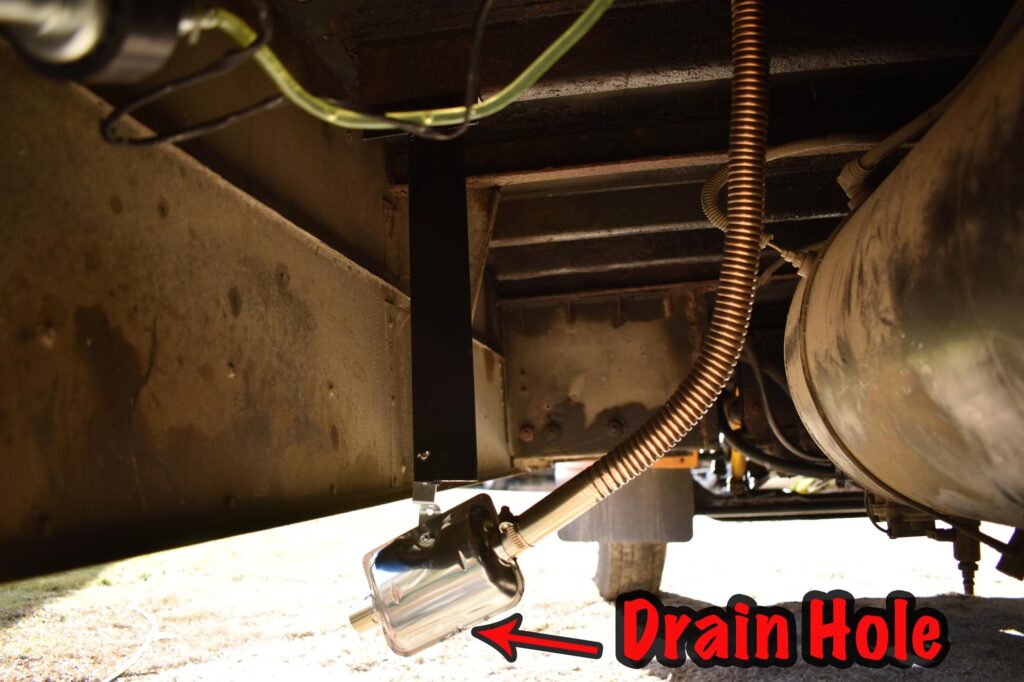
However, I needed a way to secure the muffler and pipe from bouncing all around. Moreover, installation experts recommend angling the exhaust down, without any uphill bends in order to allow any moisture to escape. Similarly, you should mount the muffler so that the drain hole points down. (It would be easy to miss this detail!)
I didn’t have any viable attachment points there, so I had to make one.
With some scrap angle iron and steel I welded a simple “rack,” primed and painted it, then used self-tapping screws to mount it to a floor support. I then ran the exhaust pipe to it and secured the muffler to it.
Finally…make sure you secure fuel lines and wires away from the exhaust to keep them from melting! The pipe gets hot! (Tempting to try and engineer a heat exchanger for it…hmmmm…)
Securing the Air Intake
I slid a hose clamp up from the outside end of the air intake hose, twisted the filter onto the end of the hose, then slid the clamp down and tightened it. Orienting the hose toward the rear of the bus I secured it with a self-tapping screw and a hose bracket to one of the floor supports.
You’re supposed to point it towards the rear so that dirt and other detritus doesn’t blow into the intake.
Mounting the Fuel Tank
Since my bus runs on diesel fuel, I considered tapping into the bus’s fuel tank. But…it’s cold…and I didn’t want to make this a bugger project than it already was. Maybe later.
Like the exhaust, I didn’t have an accessible place to mount the fuel tank. I also needed to mount it a bit farther than I wanted (only 10 feet) because the bus air tank sat in the way.
So with some steel and sloppy welding skills, I built a rack. After priming and painting the rack I once again used self-tapping screws to mount the rack to the floor supports.
Next, I drilled holes in the mounting slots of the fuel tank.
I also wrestled with the fuel port. I had three options:
- Install it in the bottom where you can access all the fuel but worry about dirt clogging it
- Install it in the side where you lose access to 20% of your fuel capacity but stay up away from dirt
- Install the pick up pipe on the top.
I chose option 3.
First I removed the nut and cover from the top.
I drilled a 3/4″ hole in the top of the tank, then pushed a thin wire down through the pick-up pipe. Bending the wire up around the pipe at the bottom, I then fished the other end of the wire through the fuel cap opening and out through the hole I just drilled.
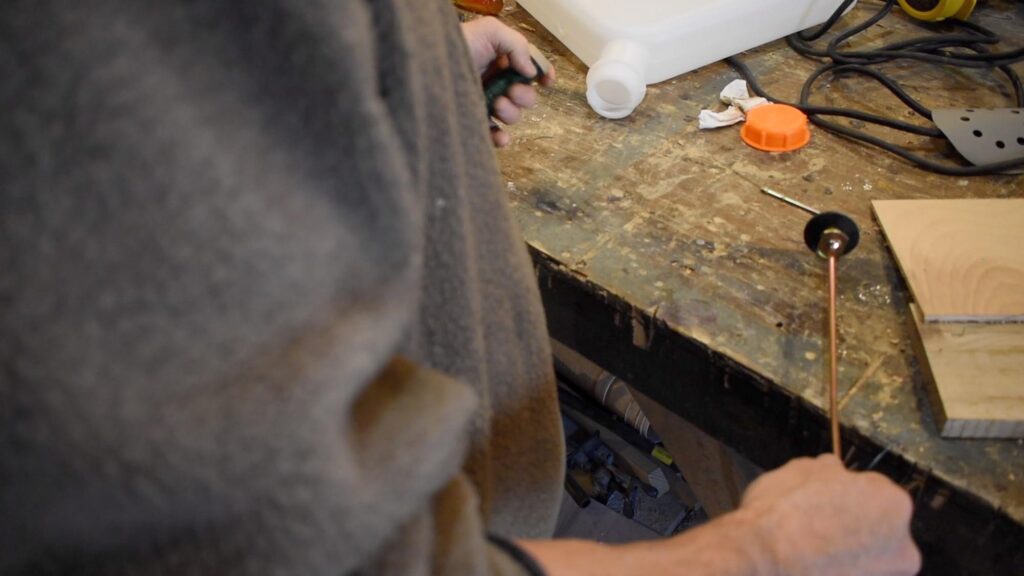
I pushed the whole pipe into the tank, then used the wire to pull the top of the pick-up tube through the drilled hole, then screwed the nut assembly back on.
Using more self-tapping screws I secured the tank to the rack.
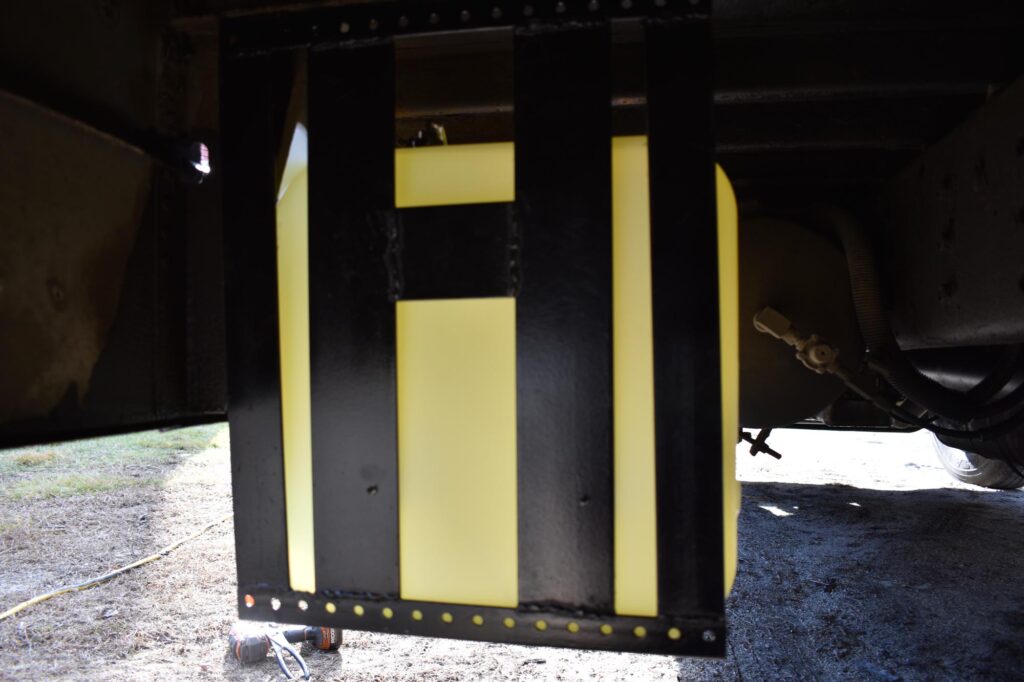
While I didn’t want to cut holes in the bus for exhaust, I did want to be able to refill the fuel tank without a hassle, so I need an access door. Using a cut-off wheel on my grinder, I cut a square hole in the bus apron.
Eventually I’ll put hinges and a latch there and make it a door. Right now it’s still a hole.
Hooking up the Fuel Pump and Fuel Lines
The pump comes with hard nylon small diameter fuel lines. People who appear to be credible on-line say that diesel heaters work best with these lines. The hard nylon maintains fuel pressure when the pump pulses and the small diameter keeps the mass of fuel in the line low enough for fuel flow.
The rigidity and small diameter make them challenging to connect, though!
Be sure to install the components in the correct order: Tank > Fuel Filter > Fuel Pump > Heater. You want to make sure that the fuel filter goes before the pump!
Also orient both the filter and the pump the correct way.


I mounted the fuel pump pointing up at a 35 degree angle. This allows air bubbles to rise and push out of the line rather than congregating in the fuel line and creating an air lock.
Also, I mounted the pump close to the tank: pumps work better at pushing than pulling, so I made the pushing distance greater than pulling.
I inserted the pump into the rubber collar, then, using the self tapping screws and an impact driver I secured the collar to the apron underneath the bus.
I measured the distance between the tank and the filter, the filter and the pump, and the pump to the heater.
Then, using an exacto knife, I cut the lines. Avoid using dull scissors or wire cutters since they could crush the tubing and restrict flow.
Using a pair of needle nose pliers, compress a clamp, slide it on the hose, connect the hose, then squeeze and slide the clamp over the metal connection point.
I connected the lines to and from the filter, then the line from the pump to the heater.
Priming the Lines
The fuel itself functions as a lubricant for the pump, so running the pump without fuel in it can increase wear. Thus, I wanted to get fuel into the pump as quickly as possible and avoid extended dry pumping. (As we all should”¦)
To accomplish this I took the filter with the fuel lines attached and submerged it into one my paint measuring cups filled with diesel fuel. I worked the fuel lines and filter around lifting and twisting to work as many air bubbles out as I could.
With the line full of fuel, I carried it out to the bus, hooked one end to the tank (with the other end still in the cup, then hooked the other end to the fuel filter.
Wiring the Diesel Heater
The diesel heater requires a 12 Volt power supply and a ground. From what I understand, they can be finicky, so you really need adequate power to make heat the glow plug and run the fans.
My battery / power set up 18 feet from the heater. Using the wire size calculator found here, I found that I needed 10 gauge wire. Luckily I still had some left over from the bus flashers.
I crimped a ground lead onto the black wire from the wiring harness, ran the line to a bus rib that I still have exposed near the heater, and secured the wire to the rib with a circular crimp connector and a screw.
For the power lead, I ran a line from my power center (I used a 20 amp fuse just to get power to the line. The heater as an in-line fuse already).
I found that even with the power off, the controller still illuminates the display. I could see this power draw drawing down a battery unnecessarily when not in use. While I suppose you could just unplug the controller, I decided to hook the main power to the heater up to a light switch so that I could turn it off.
WARNING: I have heard multiple horror stories about sudden power loss without the normal shut-down sequence of fan cooling damaging Chinese diesel heaters. So be careful with this!
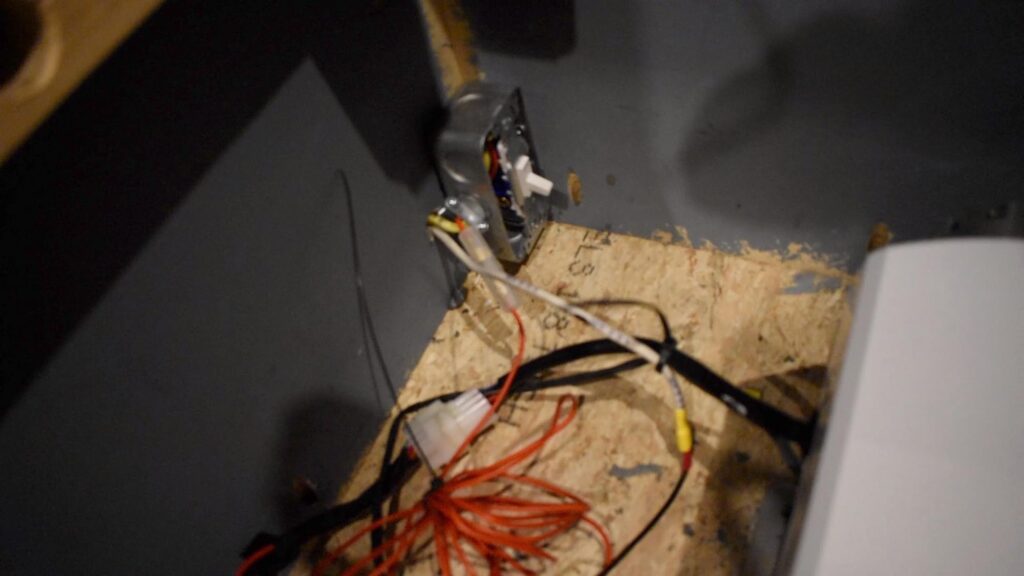
I screwed a connector into a junction box and screwed the junction box into the corner of the seat where I mounted the heater. I ran both my power lead wire and the red wire from the wiring harness into the junction box and tightened the connector.
ALWAYS connectors when running wires into panels or boxes! I see so many pictures online of people running wires into metal boxes without them. The vibrations of the bus will rub the insulation off the wires and cause shorts or worse!
I hooked each wire to a pole on the light switch and, voila! A power saving device!
Testing the Diesel Heater
(Full disclosure: I temporarily hooked up power to test the heater before I did the fancy wiring above!)
Again…I felt like I was spinning the roulette wheel and waiting to see if I won.
I pressed the power button for 3 seconds and released it.
Fans whirled…for about 30 seconds.
The pump clicked.
I saw the glow plug light come on.
Then E-10 error message and cold air.
Drat.
I had printed out some handy-dandy error message codes (I AM a positive person…I’m POSITIVE that something will go wrong but THINK that I can fix it.”
It read “no fuel.”
The tank was full, the lines bled and the pump was clicking so the possibilities were limited.
I crawled under the bus and found the culprit. When I had inserted the intake / exhaust / fuel apparatus through the floor, the fuel line crimped. I straightened it, returned topside and hit the power button.
Again fans whirled, pumps clicked, then in about 5 minutes I began to feel hot air coming out of the heater!
I hooted AND hollered!
Chinese Diesel Heater Performance
The outside temperature hovered at a cool 38F.
Our full size bus is 30 feet from entry door to back door.
We have 2 inches of spray foam insulation in the ceiling, 2 inches of rigid foam in the walls, and one inch of rigid foam in the floor. We have two skylights, mostly original school bus windows, (we deleted 5), and have yet to insulate the back wall and bulkhead.
In three hours the living room / kitchen area hit 65 degrees. The bedroom was 54.
Sitting right in front of it…hot air blasts you! (In a good way!)
I have noticed that once inside temperature hits 60 degrees the heater hums along at “H3″ level and maintains temperature pretty well.
I would guess, though, that if you wanted to spend extended time in below freezing temps that a second heater would be desirable!
Is it a dry heat? I guess so…there’s some condensation on the windows, but no much.
Using the Diesel Heater Controller
Good-luck.
Ok..that was flippant, sorry.
I didn’t find basic operation too difficult to figure out. However, in watching videos and looking for manuals online I found that my controller responded differently. For example, other people pressed a combination of different buttons to prime the pump, but mine was different.
I’ll post the instructions that mostly work for my 5KW heater here.
For the most part, though, I think different owners have to experiment.
Diesel Heater Conclusion
Of all my heating options, I’m happy with the Chinese diesel heater. It’s a better heat than any of my other choices.
I like the dry heat. It’s still early in our use, but I haven’t noticed much condensation yet.
I like it’s compact size. It takes up much less room than the propane furnace I was going to use.
The fuel consumption it reasonable. Running on low it will go for 3 days on one tank of diesel fuel.
People have said that they are noisy. Well…it makes noise for sure. However I didn’t find it obtrusive at all. In fact, I kind of liked the little bit of reminder that it was running!
It does have a power draw to run the fan…so I need to have a way to charge the house batteries.
I don’t like that the controller is on even with the diesel heater off. It would be nice if it had a “sleep” function to save on battery power. I can use my light switch option, but that will force me to reset my clock every time if I ever want to use the timer function.
I came with NO…ZERO…ZILCH instructions. Fortunately, like most things Skoolie, a virtual network stands at the ready out there to provide help and insights. I’m really enjoying the facebook diesel heater group which provides a vast array of knowledge and insights.
And, finally, I can’t say that the controller is that intuitive. I still haven’t been able to set the time!
Ultimately, with the weather growing colder I am happy for a heat throwing device in the bus…and am glad that I didn’t go with the old propane heater. If you’re considering one, I would recommend it as a great option.
As always, feel free to comment or ask questions.
Thanks for dropping by and best of luck with your build!
Ted
If you’re looking for other articles, check out https://eddy-line.com/the-skoolie-paint-process-step-by-step/
[Update: Julie just spent two weeks living in the bus with night temps in the 20’s. “Did you stay warm,” I asked her? “Yup!” she said. “The heater worked great!” That’s good enough proof for me!]