
After cutting out all those seats, I worked to get down to bare metal where I found that I would need a rust converter.
Before I began the build, however, I need to treat the rust.
How Rust Converters Work
Rust converters use acids to convert rust (iron oxide) “into inert, insoluble products“ such as iron phosphate, iron tannate, or other form depending on the acid used.
A Variety of Rust Converter Options
Several products claim to be the best, which can be overwhelming. I set out to choose the best value product: one that will:
- Convert the rust
- Protect against future rust
- Not cost more than the bus
- Be user-friendly (environmentally safe, people and dog safe, easy to apply and quick to dry).
Our travels will be limited to southern areas in the winter, thus I don’t need the product to be bulletproof. I do, however, want it to last. Thus, I ended up choosing FDC Rust Converter Ultra as the best value. It purports to accomplish all of our established goals at $47.00 a gallon.

A study done in 2013 compared the performance of several products. Rustoleum Rust Converter outperformed Corroseal, Aspho and RCx427. In the process of researching, I discovered FDC Rust Converter Ultra that was not part of the study.
FDC Rust Converter Ultra (My choice)
Cost: Less than $50
Chemical Composition:
Coverage: 500 square feet
Clean-up: water
Drytime: 20 minutes
Notes: I like the price and the fact that it also functions as a primer for the final
paint coat. It also received a 4.5 / 5 star review on Amazon.
Corroseal
Cost: Under $50
Chemical Composition: Sodium Carbonate
Coverage: 500sq feet
Clean-up: Water
Drytime: 30 minutes
Notes: This was a close second for us.
Ospho
(a “rust-inhibitive coating”)
Cost: Under $40
Chemical Composition: Phosphoric, Dichromate
Coverage: 400 sq feet
Clean-up: water
Drytime: 24 hours
Notes: Ospho “causes iron oxide (rust) to chemically change to iron phosphate – an inert, hard substance that turns the metal black.”
Rustoleum Rust Reformer
Cost: Under $100
Chemical Composition: Tannic Acid
Coverage: 400 sq feet
Clean-up: Water
Drytime: 15 Minutes (Wait 24 hours before painting)
Notes: This would have been my choice based excellent performance in studies
and reviews. Ultimately, I decided that the cost was too high.
Preparing the Surface for Rust Converter
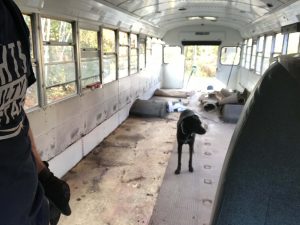
- Clearly, I needed to remove the seats, the rubber matting, and the plywood floor. You can see my video on The Best Way to Remove School Bus Seats here.
- There was no easy way to pull up the rubber mat. I wrestled it, I used a pry bar. I swore at it. I won.
- I ripped up the plywood using a 12″ crowbar, a 36″ crowbar, a hammer, and sheer will. I found it difficult to drive the end of the 36″ crowbar under the plywood, so I used the smaller crowbar to create a gap. Using the rounded edge of the crowbar, I popped the edge up. Then I switched to the long end of the bar and continued prying. Once I got about half-way, leverage decreased. On the more stubborn pieces, I grabbed an old blade and my skill saw, and just cut the pried up portion of the plywood. This gave me access to a new “edge” which was much easier to pry up.
- Cut and grind remaining screws and bolts
- Seep and vacuum,
- Hose out and mop with Simply Green and rinse. The rust converter calls for a clean and oil-free surface, so Simply Green functioned as a dual purpose soap and degreaser. I parked the bus with the back door facing downhill so water would drain that way.
- Dry with a fan.
Applying Rust Converter
- Roll on Rust Converter. The roller didn’t get the seam between the floor and the wall. Rolling also struggled to get the rust converter on rough textured areas, so I used a brush there..
- Dry.
- Roll on Rust Converter (2nd Coat)
- Admire Work. (Hey, this Bus Conversion work is stressful…gotta take time to celebrate the victories!)
Results
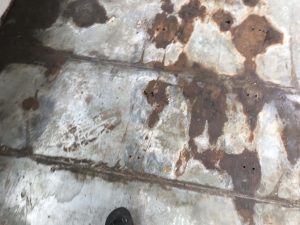
Where I applied thin coats of Rust Converter Ultra, it did, indeed, dry in 20 minutes. (It was a sunny day, about 55 degrees.) In spots like the seams between the floor and walls, I slopped it on pretty thick and it took over an hour to dry.
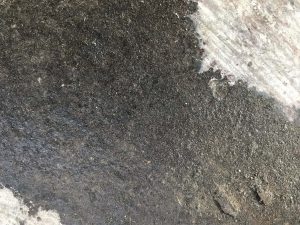
The rust areas turned purple rather quickly, then slowly turned to black. In thicker spots, however, it didn’t penetrate, so I had to go back and grind deeper.
Next Steps
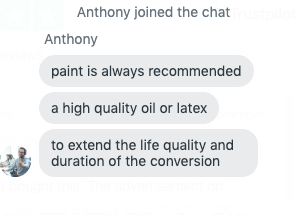
Although the website claims that it prevents “future rust,” when I contacted customer support they said that “paint is always recommended” and that “a high-quality oil or latex [will] extend the life quality and duration of the [rust] conversion.”
To see how to paint the skoolie, check out this post here!
Conclusion
I am pleased with the results of FDC Rust Converter Ultra. It seemed to convert the rust to a stronger metal, was easy to use, easy to clean up, and was significantly less expensive than competitors. It did have an odor, though I didn’t find it unpleasant.
If you like this blog post, you’ll love our free PDF that shows you how you can save HOURS or even DAYS over the course of your build. Click here for immediate access!